As the world moves tentatively out of lockdown and sees restrictions being eased in the COVID19 era, we’re all learning to adapt to the “new normal”. Whilst large-scale mass gatherings still (at the time of writing, at least) seem a long way off, many events organisers are looking for ways to replicate the experience of attending a real-life event – as best they can – online. This is particularly true of churches, which were among the first allowed to hold gatherings again – albeit in a very different format and with very restricted numbers and practices.
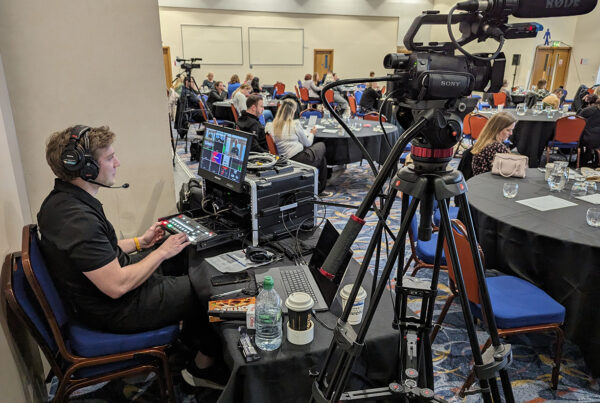
As a provider of live streaming services in Liverpool, it will come as no surprise that we have had lots of people ask us recently for advice and tips on how to live stream a church service to Facebook or YouTube, and different types of cameras for live streaming.

Live-streaming your church services means you are not entirely restricted by the number of people who can be safely accommodated inside the physical building whilst staying “COVID Safe”, as those unable to attend either because of capacity or due to shielding, quarantining and other safety concerns can watch live online from the comfort and safety of their own home, even commenting in the live chat so they can feel like they are participating and part of a wider group audience. Plus, when you broadcast your church services live to the Internet, you’re reaching a potential audience of almost unlimited size. My own church has found that during lockdown and whilst live streaming our services, we’re reaching an additional audience outside our local area which would never normally have come along or been part of the church family, but who now really appreciate feeling part of the wider online family!
What Is the Best Camera for Live Streaming Video?
To build your own live streaming setup for church you’ll need a bit more than just a camera, so in this article I’ll go through my list of live streaming camera equipment such as video cameras, microphones, video capture cards and tripods and explain what each is for, why you need it and make a product recommendation for low, medium and bigger budgets.
These will all need to connect to either a desktop PC or laptop, which will preferably have a hard-wired ethernet connection to an Internet router or switch. You’ll need a good Internet connection for the best results, with an upload speed of at least 10Mbps recommended for live streaming HD video.
Don’t worry if this all seems extremely complicated! I am available for consultancy services either in-person if you’re local to the North West of England, or via video call if you’re further afield. I can also build, install and set up your church live streaming system and provide training for members of your congregation so that they can operate it independently week in, week out. Get in touch to inquire about pricing and availability.
What Live Streaming Software Should You Use?
The software we’ll be using to bring together all your video cameras, audio sources, on-screen logos and graphics and broadcast your service to the Internet is called Open Broadcaster Software, or OBS for short. It’s used by millions of streamers and broadcasters around the world so has a huge user base, and best of all… it’s FREE! Download it here: https://obsproject.com/
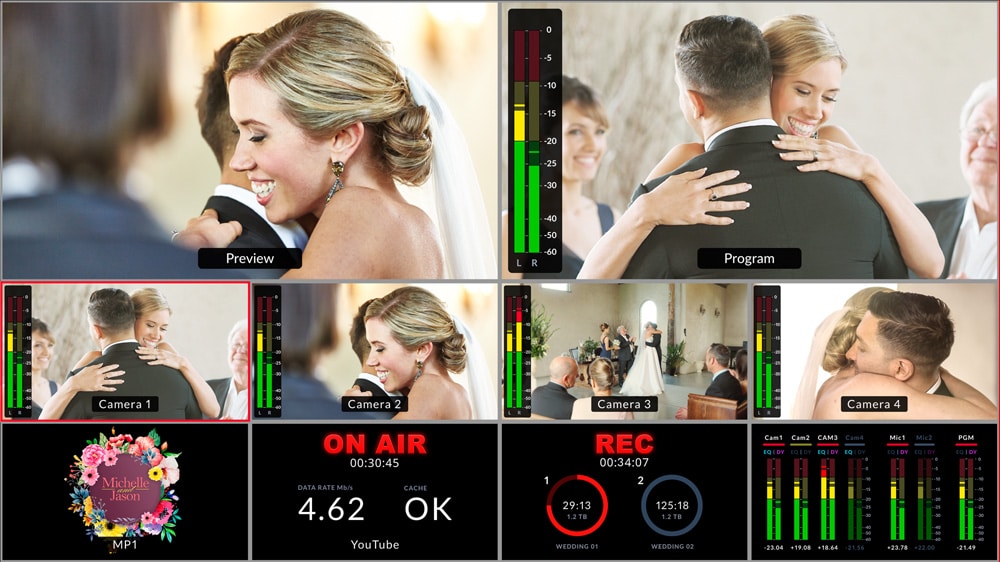
OBS allows you to set up difference “Scenes” to switch between, and add sources such as video camera feeds, an audio feed from your sound desk, graphics and on-screen logos to those scenes. You can set up a different scene for each video camera in your setup and easily switch between which one is to be broadcast out live.
When you’re live streaming, you can generally only stream to ONE place at a time, whether that’s to your church Facebook page, YouTube channel or even Twitter (via Periscope). However, if you want your service to be available in all these places at the same time then you can use a service called Restream. You simply stream to Restream, and it re-streams the event to your Facebook page, YouTube channel and Twitter feed simultaneously!
Restream starts at $16/month and if you sign up via my affiliate link you’ll get $10 credited to your account: https://restream.io/join/qqOrR
Note: this article includes paid affiliate links which means we receive a small commission from some online retailers for qualifying sales, at no extra cost to you.
Types of Cameras for Live Streaming
The most important part of your live streaming setup is, no surprise, the camera. Almost any camera will work, either out-of-the-box or with the right doodads and accessories, but not every camera will work as well or produce the best experience for your viewers. Since you (probably) don’t need to record on the camera itself, we don’t need to worry too much about memory card sizes or maximum record length times but you will need a camera which doesn’t shut off after a period of inactivity and a camera which outputs a clean HDMI signal. By “clean”, I mean without all the numbers, symbols and status logos like “REC”, “STBY” and battery status, etc.
Your church might not be that well lit for video (unless you have a fancy stage lighting setup) so you’ll also want a camera which can cope well in fairly low light conditions without the picture looking terrible. As you’ll probably be towards the back of the church, a camera with a good smooth zoom is definitely a nice-to-have too.
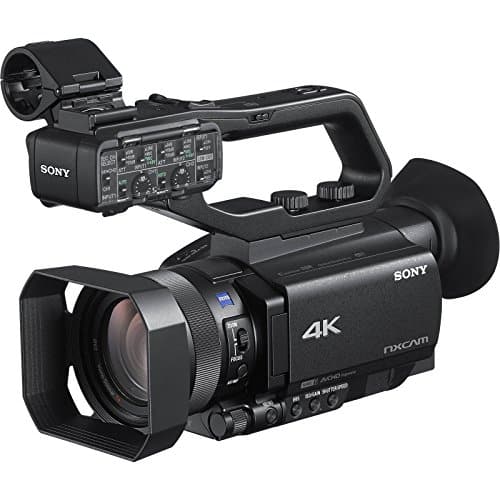
Best Option: The Sony HXR-NX80 (https://geni.us/SonyNX80) would be my first choice as it’s a highly versatile camera inside a really compact body, produces excellent images and has a great autofocus system and zoom, especially when paired with the RM-1BP on your tripod arm. In fact, I can personally vouch for this camera as it’s my main camera for all my live streaming and other promotional video work!
Best DSLRs/Mirrorless Cameras for Live Streaming
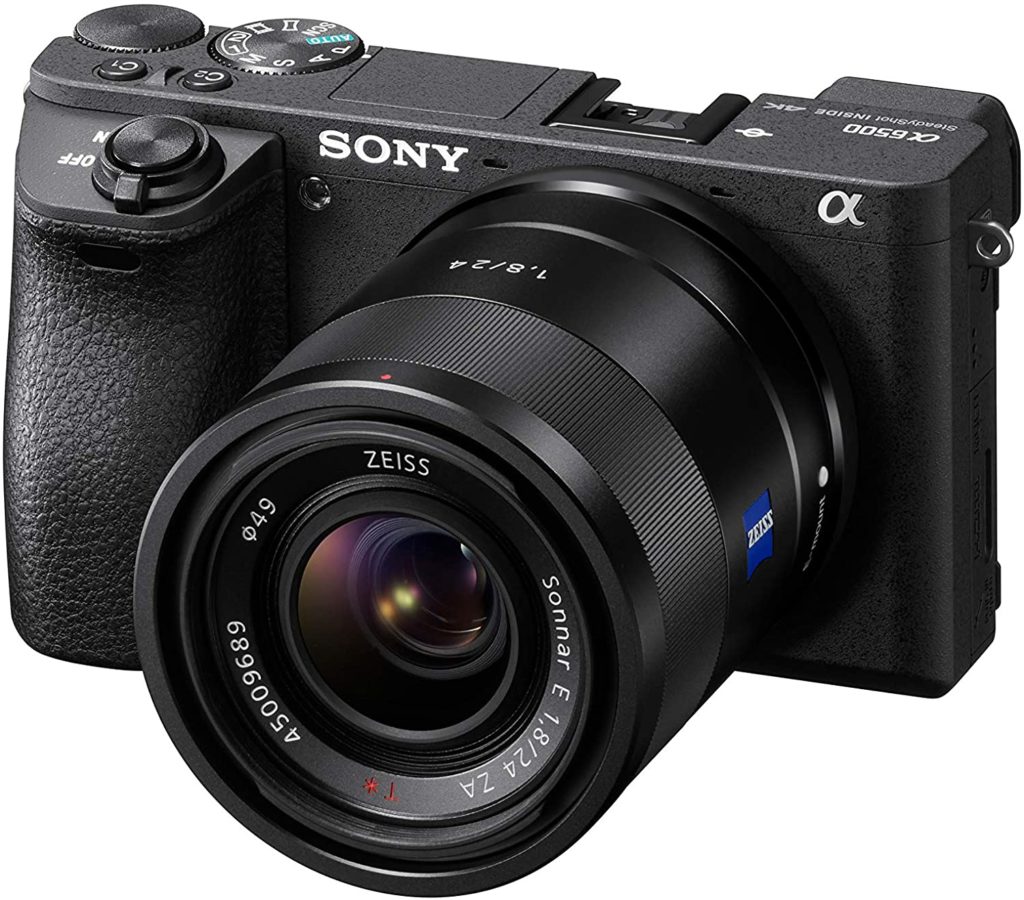
Mid-range Options: On a slightly more modest budget, the mirrorless Sony Alpha a6500 (https://geni.us/SonyAlpha-6500) is primarily a stills camera but it also shoots great video, meaning buying one could serve multiple purposes for you. You may already own a Canon DSLR such as the EOS 850D (https://geni.us/Canon850D), in which case you could use that either as your main camera or as a secondary angle. The advantage to using a DSLR is that you have a huge number of lenses to choose from, from a really fast prime lens for low light, to long telephoto lenses to get great-looking close-ups from far away.
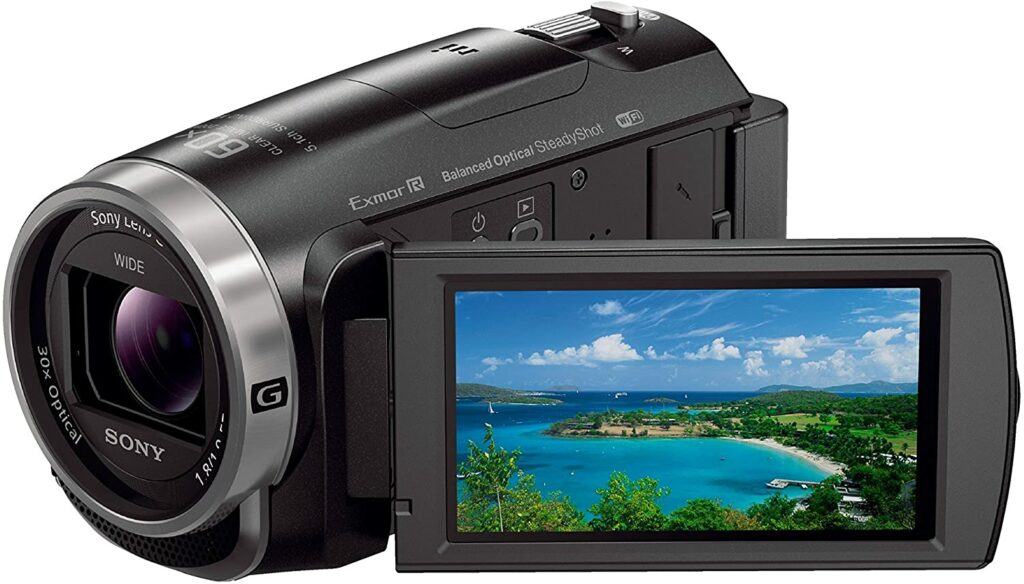
You could also achieve some great results for your live stream by using a consumer-level camcorder, such as the Sony HDR-CX625 (https://geni.us/SonyHDR-CX625) which is very affordably priced and still outputs a clean HDMI signal ideal for live broadcasts.
Best Web Cameras For Live Streaming
Finally, you can of course use a webcam for your live stream – as that’s what they were built to do! Plus, since they have a USB connection you won’t need any extra capture cards or other hardware (see the next section).
If you’re using a webcam for your live event broadcast, make sure it’s a high quality one which will cope well with poor lighting and large contrasts between light and dark areas of a scene (think: sunlight pouring in through the stained-glass windows).
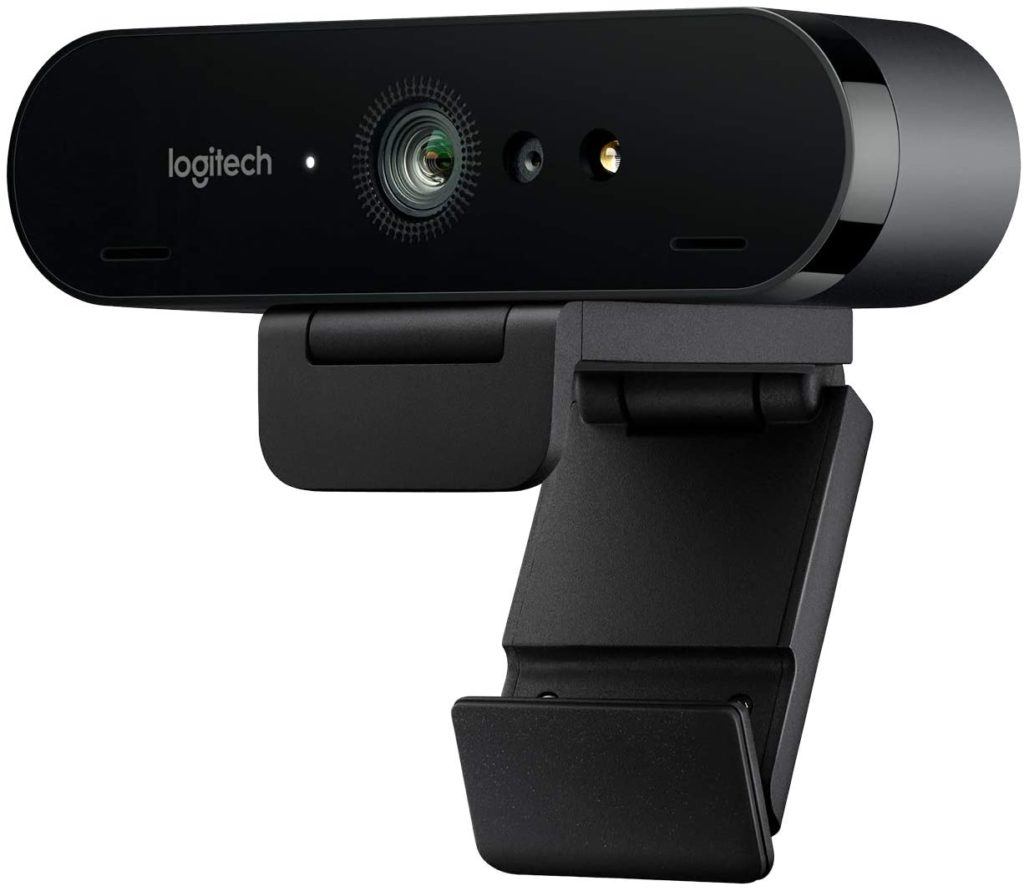
Budget Option: I personally use a Logitech BRIO 4K Stream (https://geni.us/LogitechBrio4K) as a static, wide shot which is useful to cut to when I want to reposition one of the main cameras (so the viewers don’t see me rapidly zooming out and panning over to prepare the next shot) as well as for a general view of the church and congregation. However, if you’re on a budget there’s no reason why you couldn’t use this as your main, or only, camera!
The BRIO also boasts HDR capabilities, which means its sensor can cope with light and dark areas and expose them both well enough to produce a good image.
When choosing a camera, remember that terms like “HD” and “4K” don’t necessarily mean “good quality” or that you’ll get a nice-looking image. “HD” and “4K” refer to the number of pixels, ie. coloured squares on the screen, that make up the image – nothing else. Think of it like this: a Lamborghini Gallardo Superleggera and a Škoda Fabia both have 4 wheels and will both get you from A to B, but…
So, if you have a set budget for your whole setup, make sure you don’t skimp in the camera department.
You’ll also need…
- Tripod(s) – https://geni.us/ManfrottoVideoTripod
- HDMI cable(s) – https://geni.us/LongHDMICable
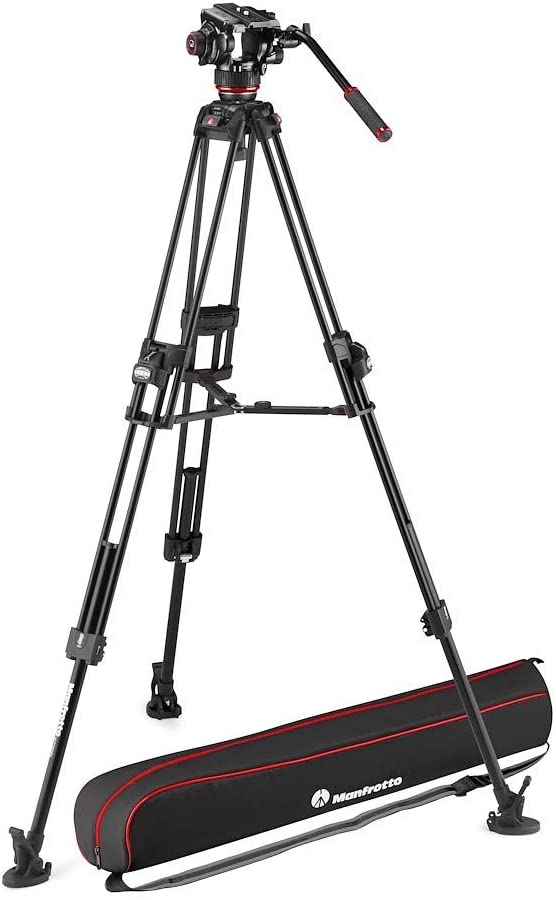
Make sure you also get a good, sturdy video tripod with a fluid head for nice smooth pans and tilts in your live stream!
Best Video Switcher for Live Streaming Church Services
If you have multiple cameras in your church live streaming setup to capture different angles (eg. the main speaker, the band, a wide shot of the congregation, etc.) then you can feed these camera signals into a device which is sometimes called a Vision Mixer and sometimes called a Switcher.
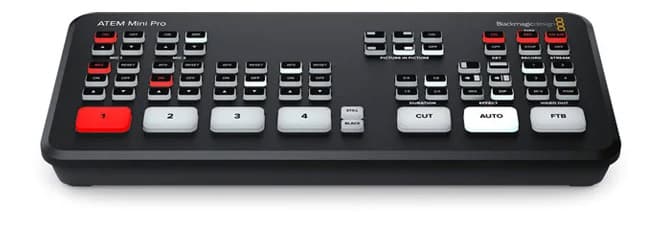
Budget Option: The ATEM Mini (https://geni.us/ATEM-Mini) allows you to plug 4 HDMI cameras (plus 2 audio inputs for an extra microphone or, say, a feed from the church sound desk) into it and then connect the device via a USB cable into a computer running software such as OBS (see below). To cut between cameras, you just press the 1/2/3/4 buttons – easy! Computers see the ATEM Mini as just a regular webcam with a video and audio feed so on the computer side, there’s no added complexity at all – it thinks it’s just live streaming a basic webcam setup.
Best Option: The ATEM Mini Pro (https://geni.us/ATEM-MiniPro) does everything without needing a laptop for streaming – you can live stream church services to YouTube or Facebook (etc.) directly from the device itself via its ethernet port, meaning you don’t need to worry about the laptop playing up and disrupting your stream, plus you won’t need to configure livestreaming software – just copy your Stream Key into the ATEM’s software (accessible via a laptop, but just as a controller). The Pro also features a more professional Multiview output which means you can connect it to a screen via the 5th HDMI port (an output) and monitor all 4 cameras as well as the audio levels and any graphics.
Both the ATEM Mini and the ATEM Mini Pro have some other advanced features like green screen chromakeying, title options and picture-in-picture to name but a few, but I won’t go into those in the interests of keeping this guide simple and to the point!
If you’re only using a single camera, or maybe a “good” camera plus a webcam, you may choose to use software on a laptop for your streaming, and instead purchase a single USB capture card which I explore in the next section…
Best Video Capture Cards for Live Streaming
Once you’ve chosen the cameras for your live streaming setup, and bought a nice long HDMI cable (see above), you’ll notice that your laptop doesn’t have an HDMI input. Unless you’re using a USB webcam, which will work on your laptop without any extra gubbins, you’ll need a way to convert the video signals from your camera’s HDMI port into something that your laptop can use and manipulate.
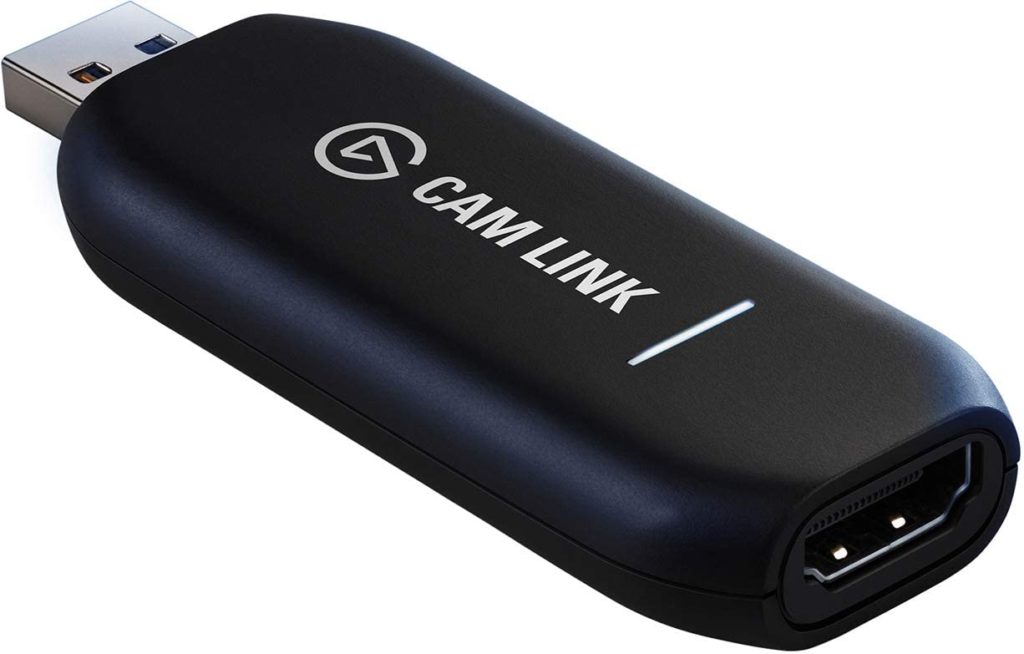
Best Option: The Elgato Camlink 4K (https://geni.us/Camlink4K) is currently the undisputed champion of USB HDMI capture cards. Don’t be fooled by its tiny dimensions; this pendrive-sized capture card does the job that just a few years ago would have required something far bigger. I love this device because it’s so simple and works so well: no drivers are required and you don’t need any instructions, either. Just plug it into a USB port, plug the HDMI cable in the other end, and it will appear on your laptop like you’ve just plugged a webcam in.
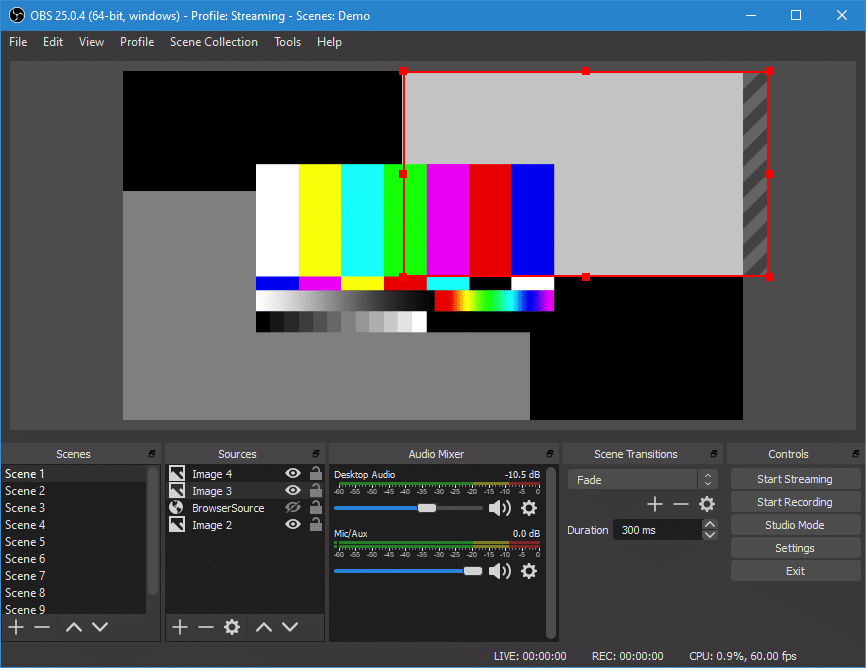
The picture quality is superb, it does audio from your camera as well (if you need it to) and the processing delay is very low (around 233ms) and easily matched to your audio sources by simply adding in a delay there:
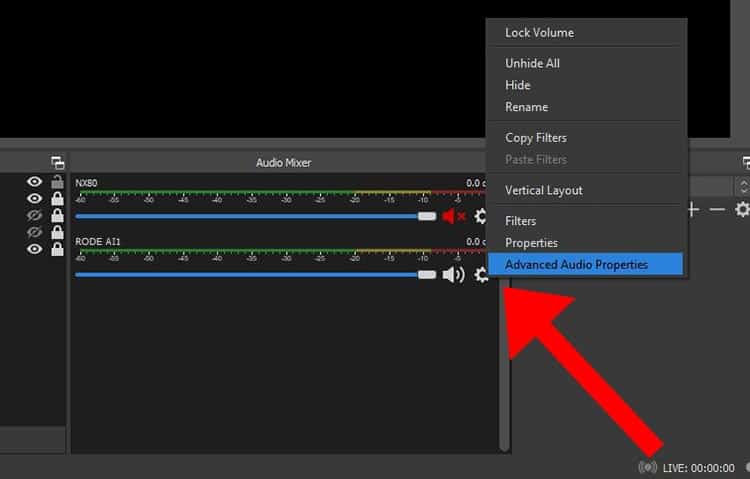
Click the cog settings icon next to your audio source in the Audio Mixer panel, and select Advanced Audio Properties.
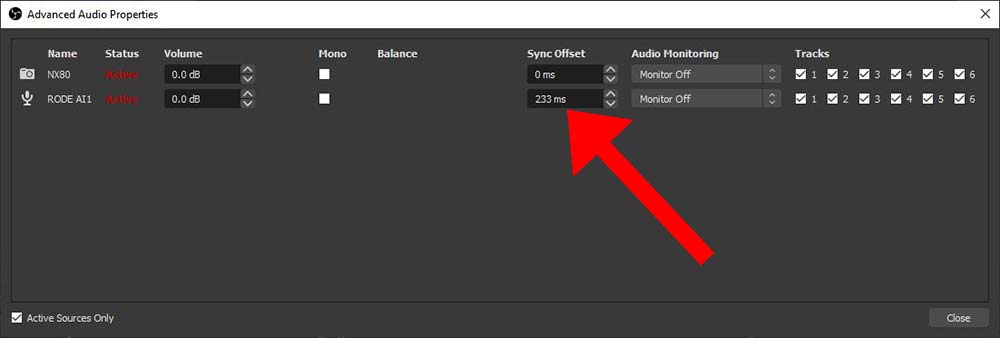
Under Sync Offset, enter in a value of 233ms, or 214ms if you’re also using a Sennheiser AVX wireless system (which already has a 19ms delay, so less extra delay is required). See later in this guide for more information on audio sources.
The Camlink isn’t cheap though (good quality equipment rarely is) so my Budget Option would be to use a non-branded equivalent which you can usually find on eBay for about £10, like this one: https://ebay.to/3ljpjfs – bear in mind, though, that you get what you pay for and although this will probably work, the picture quality may not be as good, it may have more of a delay, and it might go pop! in the middle of a live stream. You’ve been warned!
I also have a Free Option for this section, because depending on what camera you’re using you may be able to simply connect it to your laptop with a USB cable and have it act like a webcam. During the 2020 Coronavirus lockdowns around the world, webcams suddenly became hot property so camera manufacturers like Sony and Canon released utilities to allow their cameras to function like higher-quality webcams. The frame rates you achieve may vary, so don’t expect top quality, but you can’t argue with free…!
You may also need…
- USB 3.0 Extension Cable – https://geni.us/3mUSB3
You WILL also need…
- Powered USB hub [essential!] – https://geni.us/PoweredUSBHub
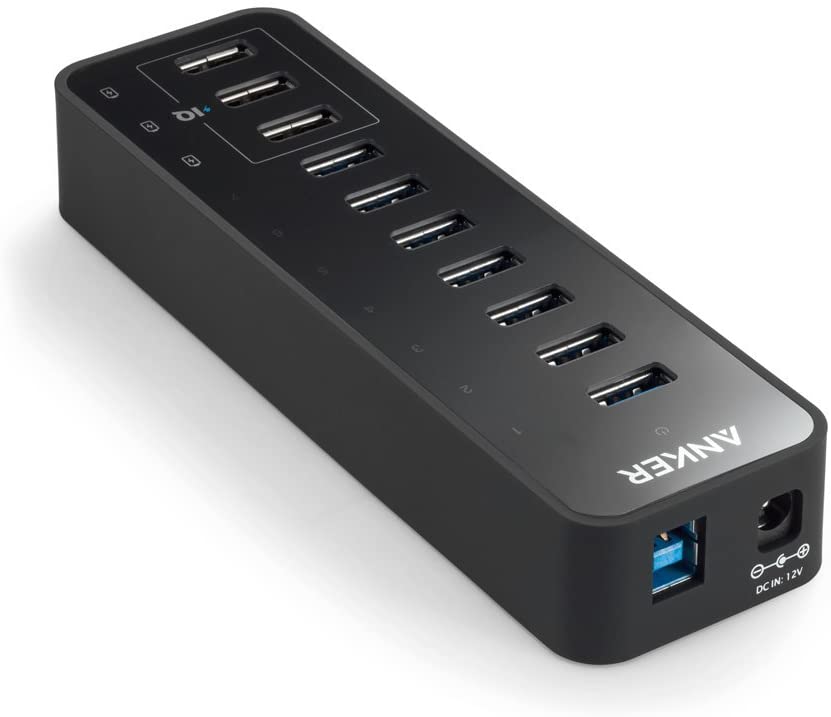
(Why? Because most laptops will struggle to provide enough power to all USB ports at once whilst also encoding video for streaming. If you have a couple of capture cards, a webcam and an audio interface all trying to suck juice, they probably won’t be able to pull enough amps to run properly and you’ll run into problems. Trust me!)
What’s the best Audio Interface for Live Streaming?
So that’s the video side of things sorted, but it’s commonly accepted in the video production industry that audio is even more important than video picture quality. Why? As humans we’re generally a lot more forgiving of poor picture quality, but your viewers will turn off pretty quickly if they can’t hear things properly or it’s painful to listen to.
So, getting the sound for your live stream right is really important. How you approach this will vary depending on the setting but most churches will already have a PA system and a variety of microphones so the best route is to take a direct feed from the venue’s sound desk via a long XLR cable to your equipment. Depending on the mixing desk, you may also be able to adjust levels of different channels for your output to the live stream independently from the main output to the church loudspeakers, giving you lots of control to make sure your viewers back home get the best listening experience possible.
But hang on, you may be saying… my laptop doesn’t have XLR audio inputs?! That’s right, and just like the video camera signals need a device to send them into your computer via USB, the same is true for your audio signal.
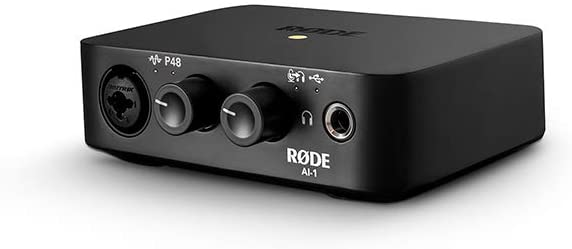
Best Option: The RØDE AI-1 Audio Interface (https://geni.us/RODEAI-1) is a superb piece of equipment which lets you deliver crystal clear audio into your computer, via its Combo Jack which accepts both XLR and quarter-inch jack cables. This then connects via USB to your computer and simply appears in your system as an audio device which you can use in OBS.
You’ll also need…
- Long XLR Cable: https://geni.us/XLR-cable-30m
- Headphones to monitor the audio: https://geni.us/SonyMDR-7506
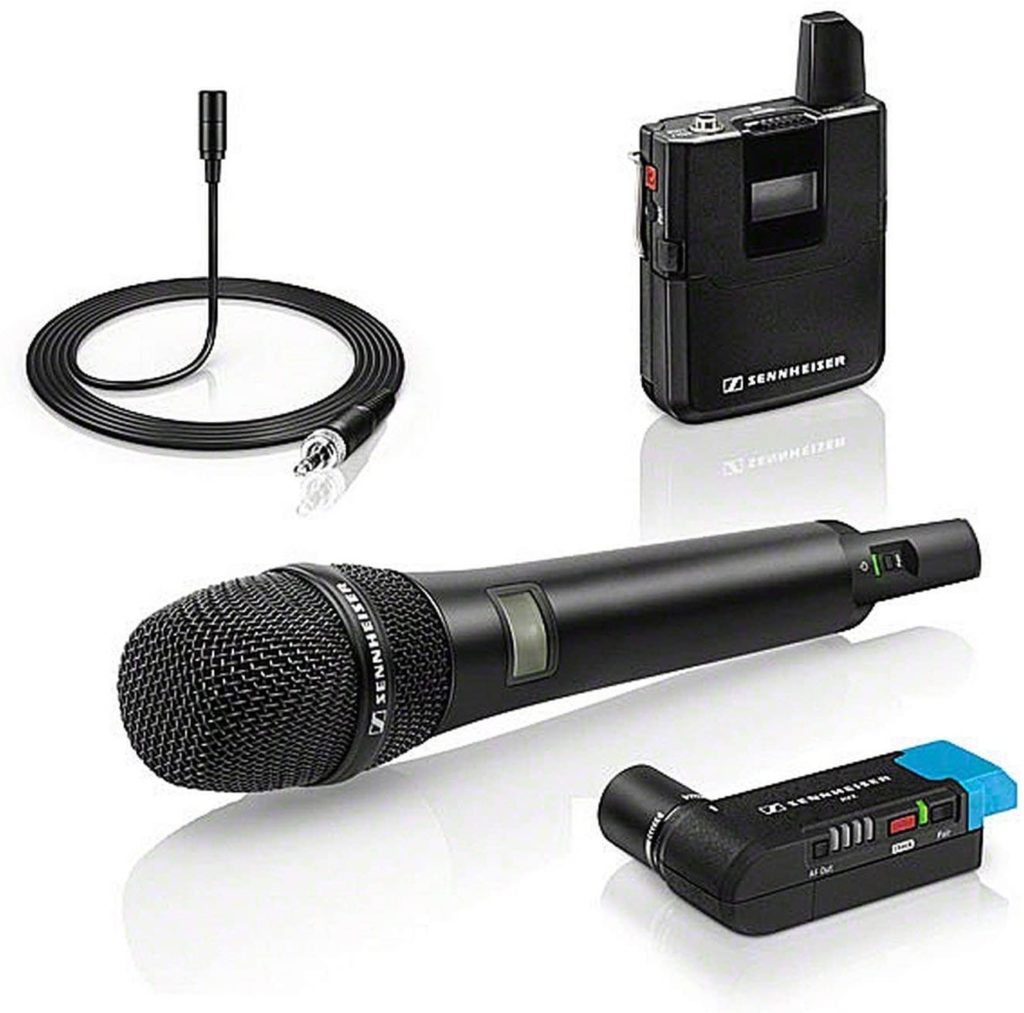
Top Tip: As an alternative to a long XLR cable, I’ve had some great results (even if it is a bit of a ‘bodge’) using my Sennheiser AVX Wireless system (https://geni.us/SennheiserAVXWireless) to send an output from a sound desk to my live streaming station where the two are unfortunately at opposite ends of a large venue space. You’ll just need an XLR to Mini-Jack cable (https://geni.us/XLR2MiniJack) to connect the sound desk’s output into the AVX transmitter, and to connect the AVX receiver into the audio interface. [AVX has 19s latency, so you’ll want to account for that when syncing your audio and video.]
Free Option: You may, depending on your laptop, be able to run the audio directly into the 3.5mm jack microphone input and tell OBS to use that input. However, the quality and reliability of your audio signal will vary depending on your laptop, and I would recommend against this option for long-term use.
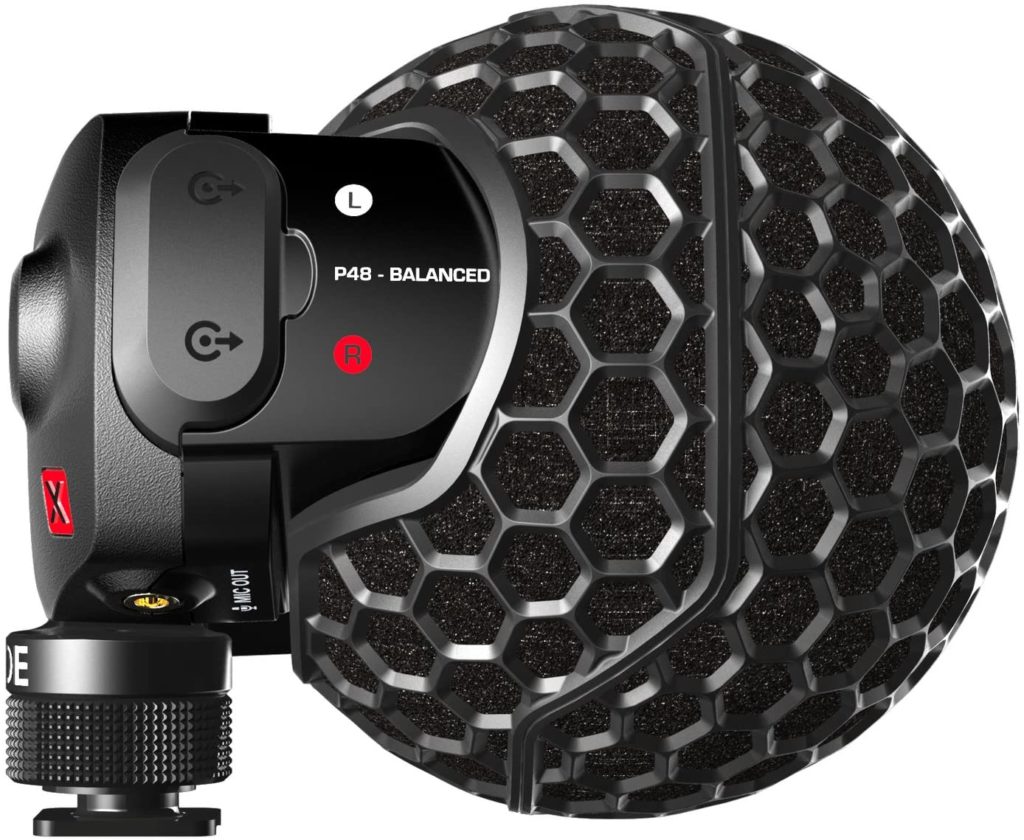
As an alternative to using an audio interface, you could also consider using a USB condenser mic such as the RØDE NT-USB or USB-Mini for ambient sound. These are great microphones, although not quite intended for this purpose so mileage may vary and you could pick up some room echo or even any sounds you yourself make if you’re stood too close to them. RØDE also make the Stereo VideoMic X, which is primarily intended to be camera-mounted but you can also mount it to a small tripod and position somewhere towards the centre of the action. It offers balanced dual mini XLR outputs, which can be run off the 48V phantom power from the AI-1 audio interface, or powered with a battery and run into the jack input to your laptop.
Here are links for those options:
- RØDE NT-USB: https://geni.us/RodeNT-USB
- RØDE NT-USB Mini: https://geni.us/RODE-NT-USB-mini
- RØDE Stereo VideoMic X: https://geni.us/StereoVideoMicX
The Best Laptops for Live Streaming
Now that we’ve sorted cameras, video capture cards and your audio interface it’s time for the final piece of the puzzle: your live streaming laptop. If you already own a laptop then it may well be up to the task, but if you’re looking to purchase one specifically for the purpose then I’d recommend you look for the following minimum specifications, to ensure a hassle-free and good-quality experience. Of course, you may wish to purchase or build a Desktop PC as part of your permanently-installed live streaming setup, in which case the same hardware advice applies.
- Processor/CPU: A quad-core Intel® i7, 4th Generation or better
- Graphics/GPU: Either a Quick Sync-enabled CPU or even better, an NVIDIA NVENC-enabled GPU
- Memory/RAM: 16GB or better
- Storage: this is less important, but if you’re also recording then I’d go for a 512GB SSD or larger.
- Display: Touchscreen is great when using Multiview inside OBS as your vision mixer, but not essential
- Network Connection: Gigabit Ethernet port
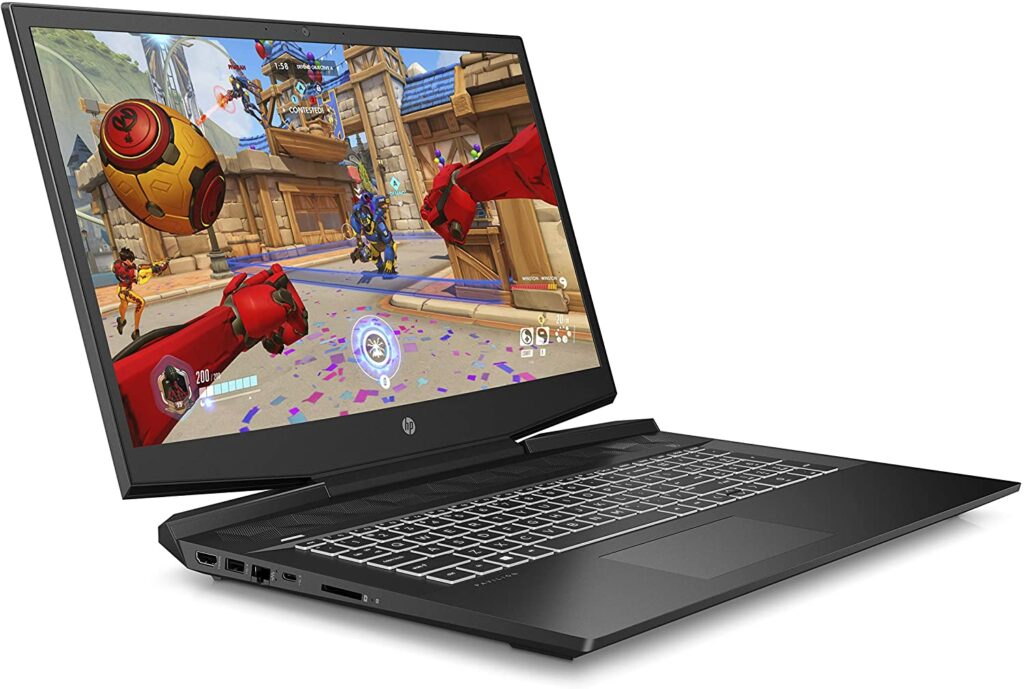
It’s difficult to make a firm recommendation when it comes to a laptop for live streaming church services, because the market is so fast-moving and prices change all the time. However at the time of writing this post, a quick look on Amazon has uncovered the HP Pavilion 17-cd1014na (https://geni.us/LiveStreamingLaptop) which I think would be a great option. Why? It’s got a nice big clear screen so you’ll be able to see what you’re doing, it’s got plenty of memory and a great processor and graphics card combination for handling and encoding all your video feeds for the live stream.
Bonus: Get a Direct Feed of your Church’s Big Screen Projection inside OBS via NDI
If your church makes use of a big screen projector and/or other monitors around the building for displaying song lyrics, bible readings, videos and other info, you’ll want to be able to relay this to your viewers watching the live stream, too. You could, of course, feed an HDMI signal from the church AV system into an additional cheap capture device. Another option – so long as the computer running the projection software is on the same network as your live streaming computer – is to send the signal over the network using a technology called NDI.
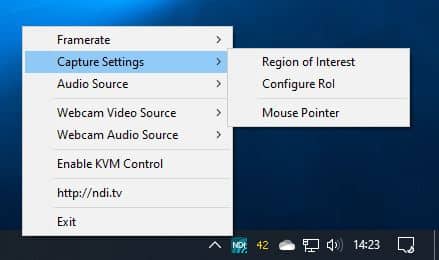
To set this up, simply download and install NDI tools (https://ndi.tv/tools/#download-tools) on the church projector laptop and run the Scan Converter utility. This sits in your system tray and doesn’t do much, but you can right-click it to bring up its settings. Set the Framerate to match your Canvas in OBS, and under Capture Settings make sure that “Region of Interest” is unchecked, so that it will make the entire display available.
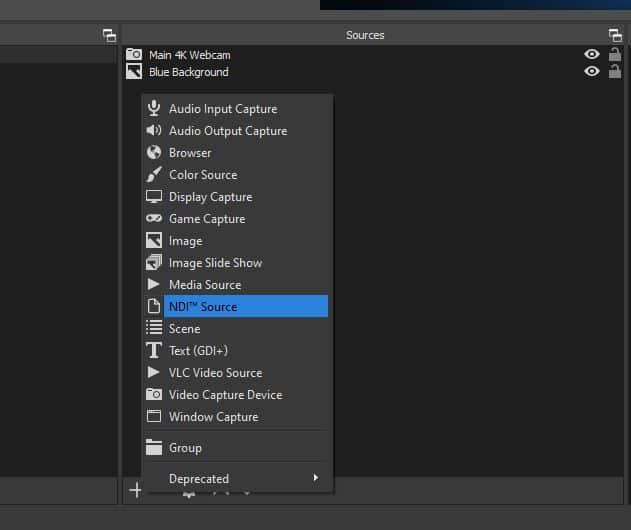
Then install the NDI plug-in for OBS to enable you to select that as another video source. I’d recommend creating a brand new scene containing just this source + your main audio source, and maybe add it to other scenes for a “picture-in-picture” style view.
Best WiFi Routers for Live Streaming HD Video
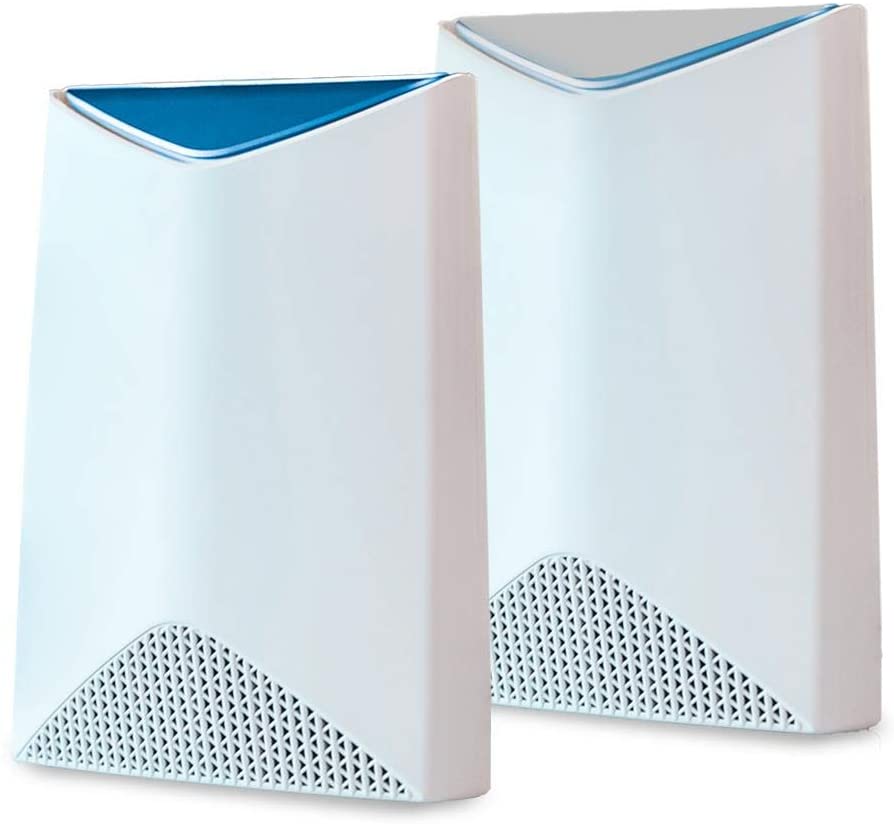
Finally, whilst I’d strongly recommend that you connect to your Internet router via an Ethernet cable if at all possible, sometimes that’s just not possible. If you have to use WiFi then make sure your wireless router is up to the job. If it’s not, or you have weak coverage and blackspots around your church building, I can highly recommend either the Netgear Orbi (https://geni.us/NetgearOrbi) or the Orbi Pro (https://geni.us/OrbiPro) if you want some extra advanced features such as creating separate networks for all your AV gear and a limited Guest network.
You can learn more about the Netgear Orbi on the Switched on Network website: https://www.switchedonnetwork.com/tag/netgear-orbi/
In Conclusion…
I hope you’ve found this guide both informative and inspirational – live streaming your church services can be great fun as well as being a huge blessing to those unable to attend for whatever reason. Please share this article with anyone who would benefit from it, and don’t forget to check out our Event Live Streaming services in Liverpool for work with other types of live event broadcasting, too.
If you have any questions or comments, feel free to leave them below or you can also follow me on Twitter – @paulfp – to ask a question.
As I mentioned earlier in the article I’m also available for paid consultancy services either in person or via video call, and if you’re planning on buying any of the gear I’ve recommended and would like me to install it all and provide training on how to use it, just get in touch!